Setting up the Google Instant Indexing API WordPress integration sounds like a fifteen-minute job, and it nearly is, once you know where the landmines are buried. Google’s Indexing API has a daily quota of 200 publish requests per project by default, and the only two content types Google’s documentation officially supports for it are JobPosting and BroadcastEvent, livestream videos. Everything else returns HTTP 200 and gets quietly dropped on the server side. We’ll get to that. First, let’s build the thing that does the dropping, because despite all of that, a non-trivial number of WordPress folks running it report faster first-crawl times for normal posts, and the cost of being wrong is approximately zero. Worst case, you’ve practised your OAuth2 JWT-signing skills on a free quota.
This is the end-to-end setup guide for the Google Instant Indexing API on WordPress, using the MyGuard Pings module’s Google Indexing subtab. By the end you’ll have a service account, a downloaded JSON key, a verified Search Console ownership grant, and a single test ping returning a clean 200 from indexing.googleapis.com. If you’re here looking for the IndexNow alternative (which actually works for normal blog posts), skip to the FAQ at the bottom, short answer: we ship both, IndexNow is the recommended default, and you should probably enable IndexNow first.
The honest disclaimer up front
Read this once, then we never have to talk about it again.
Google’s own Indexing API quickstart opens with a fence: “Only use the Indexing API to notify Google of JobPosting or BroadcastEvent embedded in a VideoObject.” That’s the entire supported surface. Job listings and livestream events. Nothing else. John Mueller from Google’s Search Relations team has restated this multiple times on Twitter and at office hours. If you submit a URL that isn’t one of those schema types, the API returns 200 OK with a friendly urlNotificationMetadata object, and then nothing happens. The signal is discarded server-side. Google does not promise it will affect crawl scheduling for general content, and they explicitly say it doesn’t.
So why does every SEO plugin ship this feature? Two reasons. One: between roughly 2019 and 2021, the API did have an observable effect on first-crawl latency for non-JobPosting content. That window has closed but the muscle memory hasn’t. Two: even today, a noisy minority of SEOs swear they still see faster discovery. There’s no controlled study, only forum threads. The honest engineer’s take is: it’s free, it’s harmless, the quota is small, the worst case is a no-op. If you have the patience to set it up, set it up. If you don’t, enable IndexNow instead, IndexNow is an open spec, multi-engine (Bing, Yandex, Naver, Seznam), and it actually works for arbitrary content. The MyGuard Pings module enables IndexNow by default; this article is about the Google-specific bit you have to opt into.
What the Google Instant Indexing API WordPress setup actually builds
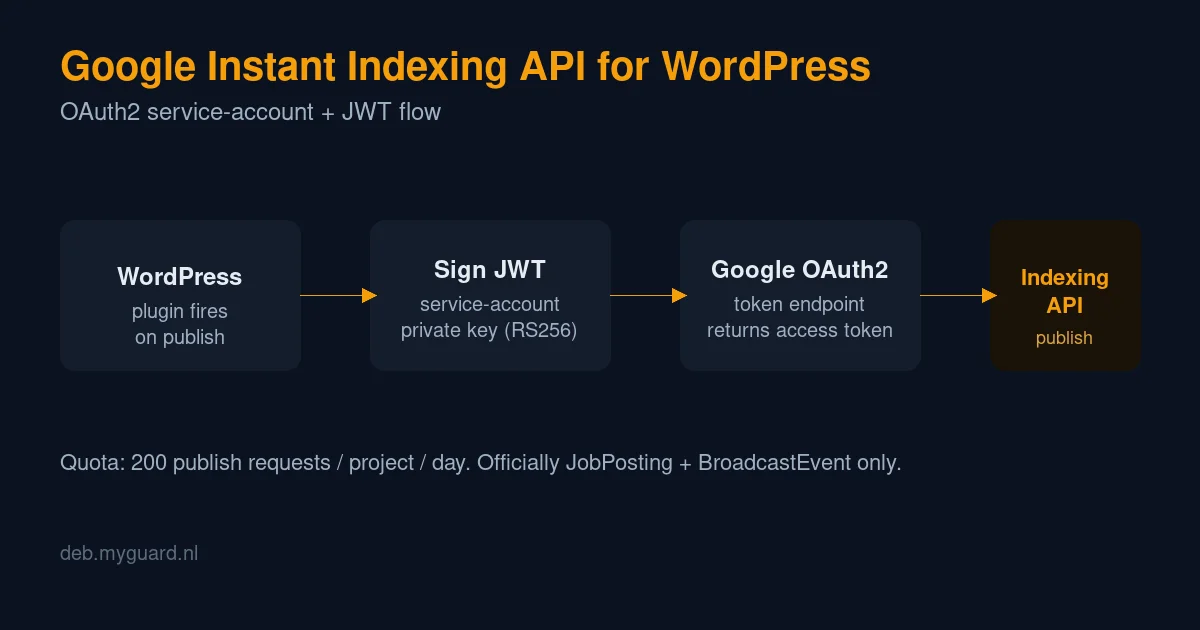
Before the click-through, it helps to know what we’re assembling. The Google Indexing API doesn’t take a username and password. It uses OAuth 2.0 with a service account, a non-human Google identity you create, give a private RSA key, and authorise to act on your domain. The flow looks like this:
- Your plugin builds a JSON Web Token (JWT): a short signed payload that says “I am service account X, and I want to do indexing things for the next hour.”
- It signs that JWT with the private key you downloaded (RS256, that’s RSA-SHA256).
- It POSTs the signed JWT to Google’s OAuth token endpoint and gets back a short-lived access token (about an hour).
- It uses that access token as a bearer credential to call
https://indexing.googleapis.com/v3/urlNotifications:publishwith the URL it wants Google to crawl.
The MyGuard plugin handles steps 1–4 for you. Your job is steps 0a through 0g: creating the service account, downloading the key, granting it ownership in Search Console, pasting the JSON into the plugin. All the cryptographic plumbing is on our side. You’re providing identity.
Step 1, Sign into the Google Cloud Console
Open console.cloud.google.com. Sign in with whichever Google account you want to own this service account, most sysadmins use their main Workspace identity here; some create a dedicated ops@ alias so the indexing project survives staff turnover. Either is fine. The service account itself is what matters, not the human who created it; you can transfer projects between owners later.
If this is your first time in Cloud Console, Google will ask you to accept the terms and pick a country. You’re not signing up for billing, the Indexing API has a free quota of 200 requests/day and doesn’t require a billing account to use at that tier.
Step 2, Create a project
Top bar, the project dropdown (left of the search box). New Project. Name it something boring and self-explanatory. I use wordpress-indexing; you’ll thank yourself in a year when you’ve forgotten what untitled-project-7 is supposed to do. Leave the organisation field as-is (it’ll default to your personal account if you’re not in a Workspace org). Click Create and wait ten seconds for the spinner.
Once it’s created, make sure the project dropdown is showing your new project. This is the single most common mistake in this entire procedure: people enable APIs and create service accounts in the wrong project, then wonder why nothing works. Check the top bar. The active project name appears there. It should say wordpress-indexing (or whatever you called it).
Step 3, Enable the Indexing API
Hamburger menu (top-left) → APIs & Services → Library. In the search box, type indexing. The first result will be Web Search Indexing API (or just Indexing API, the rename has been ongoing). Click it. Hit the big blue Enable button. It’ll think for five seconds and then drop you on the API’s dashboard.
If you skip this step, every API call later returns the gloriously specific error “Indexing API has not been used in project wordpress-indexing before or it is disabled. Enable it by visiting…”, followed by a URL that takes you right back to this page. Google’s error messages here are unusually good. Trust them.
Step 4, Create the service account
Hamburger menu → IAM & Admin → Service Accounts. Click + Create Service Account at the top. You’ll see a three-step form.
- Service account name: something descriptive.
wp-indexing-botworks. This becomes the prefix of the auto-generated email: you’ll end up with something likewp-indexing-bot@wordpress-indexing.iam.gserviceaccount.com. - Service account ID: Google fills it in from the name. Leave it.
- Description: optional. Write “Pings Google Indexing API for new WordPress posts on deb.example.com” or whatever helps future-you.
Click Create and Continue. The next step asks you to grant this service account access to project. Skip it. The Indexing API does not authorise via project-level IAM roles; it authorises via Search Console ownership (we’ll do that in step 6). Granting a project role here is harmless but unnecessary, and granting Owner on the project is actively dangerous, it gives the service account power over your entire Google Cloud project, not just indexing. Skip the role assignment, click Continue, then Done.
You’ll land back on the Service Accounts list with one new entry. Copy the email address (the long ...gserviceaccount.com string). You’ll paste it into Search Console in step 6. Keep it on the clipboard or jot it down.
Step 5, Generate and download the JSON key
Click the service account’s email in the list. You’ll land on its details page. Top tabs: Details, Permissions, Keys, Metrics, Logs. Open Keys.
Add Key → Create new key. A modal pops up asking JSON or P12. JSON. Always JSON. P12 is a legacy format (PKCS#12, a 1996 vintage container originally for client TLS certs) that the modern Google SDKs still support but which nobody on the WordPress side wants to deal with. Click Create.
Your browser will download a file. The filename is something hideous like wordpress-indexing-a1b2c3d4e5f6.json. Open it in a text editor. You’ll see this:
{
  "type": "service_account",
  "project_id": "wordpress-indexing",
  "private_key_id": "abc123...",
  "private_key": "-----BEGIN PRIVATE KEY-----\nMIIE...lots of base64...\n-----END PRIVATE KEY-----\n",
  "client_email": "wp-indexing-bot@wordpress-indexing.iam.gserviceaccount.com",
  "client_id": "12345...",
  "auth_uri": "https://accounts.google.com/o/oauth2/auth",
  "token_uri": "https://oauth2.googleapis.com/token",
  "auth_provider_x509_cert_url": "https://www.googleapis.com/oauth2/v1/certs",
  "client_x509_cert_url": "https://www.googleapis.com/robot/v1/metadata/x509/wp-indexing-bot%40wordpress-indexing.iam.gserviceaccount.com",
  "universe_domain": "googleapis.com"
}
This file is now a private RSA key in a JSON wrapper. Treat it like an SSH private key. Anyone holding this can ping the Google Indexing API as you, until you revoke it from the same Keys tab. Do not commit it to git. Do not paste it into a Slack channel. Do not email it to yourself unencrypted. If it leaks, go straight back to the Keys tab, delete that key entry, and generate a new one, there’s no PEM-passphrase concept, no rate-limit-the-blast-radius option, just “key exists” vs “key doesn’t exist”.
If you’re the kind of paranoid that I am, save the key into something like Bitwarden / self-hosted Vaultwarden as a “secure note” once it’s pasted into the plugin, then shred the local copy:
shred -u ~/Downloads/wordpress-indexing-a1b2c3d4e5f6.jsonThe key is now in WordPress’s wp_options table, which is approximately as safe as the rest of your WordPress install. That’s a real consideration, if a third party gains read access to your database (SQL injection, misconfigured backup, a stolen wp-config.php) they get this key. Plan accordingly. If you keep encrypted DB backups off-site, encrypt them. Don’t keep plain-text DB dumps lying around in /tmp after a debugging session.
Step 6, Grant Search Console ownership
This is the step nobody explains properly and where most people fail with a 403.
The Indexing API doesn’t trust the service account’s existence alone. It checks, on every request, whether that service account is listed as an Owner of the target site in Google Search Console. Lesser roles (Full user, Restricted user) return 403. Must be Owner. This is unusual, Google services normally accept multiple permission levels, but the Indexing API was built when domain ownership was the only model that made sense for “may I tell you to re-crawl this”.
Go to search.google.com/search-console. Pick the property for the domain you want to ping. If you don’t have one yet, add it now (the domain-property type is preferred; it covers all subdomains and protocols, but requires a DNS TXT record to verify). Take that detour, come back, then continue.
With the property selected, click the gear icon (Settings) in the left sidebar → Users and permissions. You’ll see yourself listed as Owner. Click Add user in the top right.
- Email address: paste the
client_emailfrom the JSON file. The fullwp-indexing-bot@wordpress-indexing.iam.gserviceaccount.comaddress. Google will not complain that it’s not a human Gmail; it accepts service-account emails here. - Permission: Owner. Not Full user. Not Restricted user. Owner.
Click Add. The service account now appears in the Users list with the Owner badge. From this moment, the API will accept publish requests for URLs on this domain from this service account.
If you run multiple WordPress sites and want to ping all of them with one service account, repeat this Search Console step for each domain. The same service account can be Owner on as many properties as you want, there’s no per-domain key needed. The downside is that a leak gives the attacker indexing rights across all those domains, so if your blast radius matters, use one service account per property.
Step 7, Paste the JSON into MyGuard
In WordPress admin: MyGuard → Pings → Google Indexing. You’ll see two ways to provide the key:
- Paste it into the big monospaced textarea. The whole JSON, opening brace to closing brace. The plugin’s textarea is wide enough to show the structure without horizontal scrolling.
- Or click Browse next to “Or upload the .json file” and pick the file Google downloaded. The browser reads the file in JS (it never leaves your machine until you hit Save) and pastes it into the textarea for you. This is usually the more reliable path because it avoids the next paragraph’s failure mode.
The number-one paste failure is mangled newlines in the private_key field. The JSON file uses \n as a literal two-character escape inside the string. If you copy the JSON out of a terminal that does line-wrapping, or paste through an editor that “helpfully” normalises whitespace, those escapes can turn into actual newlines, breaking the JSON parse. The file upload method bypasses this; if you must paste, paste from a real text editor (VS Code, gedit, Notepad++) rather than from a terminal that’s been word-wrapping.
Step 8, Save and verify
Click Save. The plugin runs a server-side json_decode() on the field, validates that type == "service_account" and that client_email, private_key, and token_uri are all present. If the parse fails, you’ll see a red admin notice “Saved, but the pasted JSON failed to parse as a valid service-account key. The previous key (if any) was kept.” The save handler deliberately keeps your old (working) key in that case, so a fat-finger paste doesn’t lock you out of your previously-working integration.
If the parse succeeds, you’ll see a green notice showing the parsed client_email and project_id. That’s your confirmation that the plugin can actually use the key. From this point on, every ping the plugin sends will arrive at Google’s OAuth endpoint as a JWT signed with the private_key field of this JSON.
Step 9, Test now
Click Test now (uses 1 quota). The plugin picks the most recent published post (of the post types you’ve selected, defaults to Posts), signs a JWT with your private key, exchanges it for an access token at Google’s OAuth endpoint, then POSTs a URL_UPDATED notification for that post’s permalink. The expected result is HTTP 200 with a JSON body containing urlNotificationMetadata.
If you want to verify what’s actually flying across the wire, the same call from the shell looks like this, useful for debugging, for understanding, or for satisfying the urge to see the bits move:
# With $ACCESS_TOKEN obtained from the OAuth dance (the plugin does this for you):
curl -sS -X POST \
  -H "Authorization: Bearer $ACCESS_TOKEN" \
  -H "Content-Type: application/json" \
  -d '{"url":"https://example.com/your-post-slug/","type":"URL_UPDATED"}' \
  https://indexing.googleapis.com/v3/urlNotifications:publish
On success Google replies with the timestamp of your notification, proof that the request was accepted into their indexing queue. Whether they act on it for non-JobPosting content is the other question, but the API accepted you. That counts as setup-complete.
Step 10, Flip the switch
Toggle Enable on, hit Save once more. The plugin now adds a Google Indexing call to every drain tick: every time a queued post leaves the queue (whether queued by the auto-trigger on publish/update or shoved in manually from the Manual subtab), the plugin fires the Indexing API alongside whatever other endpoints you have enabled. One call per post. Subject to the 200/day quota, which the subtab shows you as a live meter.
That meter resets at 00:00 UTC. Google’s quotas are wall-clock UTC, not your local time, not your WordPress timezone. If you publish a flurry of posts late on a UTC-day boundary, half might miss the day-N quota and end up firing on day-N+1, the queue tolerates that gracefully (it just respects the per-endpoint 1/hour rate limit, separately from the daily quota).
What 200 requests/day actually means
The default project quota is 200 urlNotifications:publish requests per day. That sounds generous, and for most personal blogs it is. The math: you’d have to publish or substantively update a post every seven minutes for sixteen hours straight to exhaust it. If you do, congratulations, you’re a content farm and Google has other concerns about you.
Google publishes a quota-increase request form. It’s gated by use case, they want to see that you’re a legitimate JobPosting or BroadcastEvent publisher with a track record. Requesting more than 200/day for general blog content is almost never granted. If your real use case is a job board, request away; if not, treat 200 as a hard ceiling and design around it (which mostly means: don’t ping every trivial edit, only meaningful publishes, which the plugin already does by gating on post_modified advancing and on actual content changes).
Optional but recommended: verified quota via Cloud Monitoring
The plugin tracks your daily usage in two ways. By default it just increments a local counter every time it gets a 2xx back from the Indexing API. That works but it can drift: a manual Test now retry, a quota you spent from another script outside WordPress, a server-side rate limit you weren’t tracking, the local number falls out of sync with what Google actually thinks. There’s a fix: ask Google.
Google exposes per-project Indexing API usage via the Cloud Monitoring API as a quota/allocation/usage time-series metric. The plugin can query it directly using the same service-account JSON you already pasted in, it just needs a second OAuth scope (monitoring.read) and two extra setup steps in Cloud Console. Once it works, the subtab’s Daily quota row swaps from “local counter only” to “✓ verified via Cloud Monitoring N minutes ago” and the number you see is the real per-project total Google has registered for today.
Two steps:
- Enable the Cloud Monitoring API in the same project that owns the service account. Cloud Console → APIs & Services → Library → search
monitoring→ pick Cloud Monitoring API → Enable. Same drill as step 3 above. - Grant the service account the
roles/monitoring.viewerrole. Cloud Console → IAM & Admin → IAM → find your service account’s row (it’ll show aswp-indexing-bot@iam.gserviceaccount.com: yes, the same one) → click the pencil → Add another role → Monitoring Viewer → Save. This is read-only access to your project’s monitoring data; it can’t write metrics or change anything.
Refresh the Google Indexing subtab. If both steps worked, the meter changes to the verified-count display with a green checkmark and the timestamp of the last fetch. If something’s off, the subtab shows the literal error message from Google’s Monitoring API inline, usually either “Cloud Monitoring API has not been used in project X” (step 1 missing) or “Permission denied on resource” (step 2 missing or applied to the wrong account). The plugin caches the verified count for 5 minutes so admin page loads stay snappy and you don’t burn Monitoring API quota; that’s also why the timestamp shows “N minutes ago” rather than “right now”.
Setting this up is optional. The plugin works without it, the local counter is a reasonable proxy. But if you care about the difference between “200 calls I think I made” and “200 calls Google actually counted”, spend the five minutes.
Troubleshooting
Four failure modes account for almost every problem people have with this API.
- HTTP 403
Permission denied. The service account isn’t an Owner of the target domain in Search Console. Re-do step 6. The error text usually includes the domain it’s checking against: sanity-check that it matches the URL you’re submitting (you can’t pingexample.comif you’re Owner ofwww.example.comonly, because Search Console URL-properties are exact). - HTTP 401 /
invalid_grant. The JSON paste corrupted theprivate_key. Almost always a newline issue: see step 7. Re-upload via the file input. - HTTP 429
Quota exceeded. You’ve spent the 200 for today. The plugin’s quota meter on the subtab tells you exactly how many you’ve used. Wait until 00:00 UTC. Don’t disable the toggle in panic: the next reset will sort it. "Indexing API has not been used in project X before or it is disabled". You skipped step 3. Or you enabled it in a different project than the one your service account lives in. Cloud Console → APIs & Services → Library, search indexing, click Enable. Make sure the project dropdown matches the service account’s project (theproject_idfield in your JSON).
For everything else, the plugin’s History subtab shows the full last-7-days response log including Google’s error message body, which tells you precisely what’s wrong. There’s a per-endpoint summary too, so if Google Indexing is consistently failing while every other endpoint is succeeding, the row colours make it obvious without scrolling.
When you should use IndexNow instead (or alongside)
IndexNow is what you actually want for normal blog posts. It’s an open spec, Microsoft started it, Bing implemented it first, and now Yandex, Naver, and Seznam all participate. One ping fans out to all of them. It works for any content type, no JobPosting fence. The MyGuard plugin enables IndexNow by default with all four direct endpoints (Bing, Yandex, Naver, Seznam) plus the central api.indexnow.org fanout. The only configuration required is generating an IndexNow key, which the plugin does at the click of a button, and serving it from /{key}.txt at your site root, which the plugin also does automatically with an init hook.
Google doesn’t participate in IndexNow. Officially they “evaluated” it and decided not to join. Unofficially, IndexNow telemetry suggests the participating engines hit roughly the search-volume sweet spot you actually care about outside the US, Naver dominates Korea, Yandex dominates Russia, Seznam is the default search engine for tens of millions of Czechs and Slovaks, and Bing’s slice of the global pie has crept past 5% in 2026 thanks to its tight ChatGPT integration. Pinging those four covers a real and growing fraction of the planet.
The pragmatic stack: enable IndexNow for everything, enable Google Indexing as a best-effort opt-in (especially if you publish job listings or livestream content), and let Google’s normal crawler find your other posts via your sitemap. The plugin’s Settings subtab has IndexNow grouped at the top with its key field; the Endpoints subtab has the dozen-or-so still-living legacy XML-RPC blog ping services for the truly old-school. Use what helps; ignore what doesn’t.
Behind the curtain, what the JWT actually contains
For anyone curious, here’s the assertion the plugin builds and signs every hour to refresh its access token. The header is trivial, algorithm and type:
{"alg":"RS256","typ":"JWT"}The claim is where the interesting bits live:
{
  "iss":   "wp-indexing-bot@wordpress-indexing.iam.gserviceaccount.com",
  "scope": "https://www.googleapis.com/auth/indexing",
  "aud":   "https://oauth2.googleapis.com/token",
  "iat":   1779713000,
  "exp":   1779716600
}
iss is the issuer, your service account email. scope is the OAuth scope being requested; the indexing scope is the minimum required, no broader Google API access is granted. aud is the audience, Google’s token endpoint, which is what verifies the signature. iat and exp are issued-at and expires-at Unix timestamps; Google accepts a maximum of one hour between them. The plugin caches the resulting access token for 50 minutes (a 10-minute clock-skew margin) so the OAuth round-trip only happens roughly once an hour per service account.
The signature is RS256 over base64url(header) + "." + base64url(claim), computed with the private key. PHP’s openssl_sign($input, $sig, $private_key, OPENSSL_ALGO_SHA256) does the cryptographic work in a single call. The whole signed JWT, header, claim, signature, dot-separated, base64url-encoded, gets POSTed as the assertion form parameter to https://oauth2.googleapis.com/token with grant type urn:ietf:params:oauth:grant-type:jwt-bearer. Google returns a normal OAuth response: access_token, expires_in, token_type. That access token then gets reused for every Indexing call until it expires.
None of which you need to know to use the plugin. But if you’re the kind of person who reads a how-to all the way to the end, you’re the kind of person who wants to know what’s actually happening, and the kind of person who’d notice if I left it out.
FAQ
Does the Google Indexing API work for normal blog posts?
Officially: no. Google’s documentation states the API only supports JobPosting and BroadcastEvent (livestream) schema. Pings for other content types return HTTP 200 but are dropped server-side. Unofficially, a meaningful slice of SEOs report still seeing faster first-crawl times for general posts, especially compared to relying on sitemap discovery alone. The honest answer is: it’s free, the quota costs you nothing if you stay under 200/day, and the worst case is a no-op. For non-JobPosting content, IndexNow is the right primary tool; Google Indexing is best-effort secondary.
Can I use one service account for multiple WordPress sites?
Yes. The same service account can be added as Owner in Google Search Console for as many properties as you want, there’s no per-domain key needed. The trade-off is blast radius: if that one JSON key leaks, the attacker can ping the Indexing API as you for every domain you’ve granted it on. If you run more than a handful of sites and they matter, create a separate service account per site. If you run a few personal blogs, one shared account is fine.
What’s the difference between Google Indexing API and IndexNow?
IndexNow is an open spec, Bing, Yandex, Naver, and Seznam all participate; one HTTP POST fans out to all of them. It works for any content type, requires only a simple key file at your site root, no OAuth. Google Indexing API is Google-specific, OAuth2 with a service account, and officially limited to JobPosting and BroadcastEvent. Use IndexNow for everything; use Google Indexing as a best-effort opt-in if you want to cover that base too. The MyGuard plugin supports both and pings whichever you enable.
Is the JSON key safe to store in WordPress’s wp_options table?
It’s exactly as safe as the rest of your WordPress install. The key is a private RSA credential, anyone who can read your database can ping the Indexing API as you. Treat your DB the way you’d treat any secret store: encrypt off-site backups, don’t leave plain-text dumps lying around, restrict SQL injection vectors. If a DB leak would be a serious incident for you, generate a fresh service-account key after any incident response. The plugin makes rotation easy: paste the new JSON, save, the old key is replaced atomically.
What if Google rotates the OAuth token endpoint URL?
The plugin reads the token URL from the token_uri field of your service-account JSON rather than hardcoding it. Google has rotated this endpoint roughly once a decade (from accounts.google.com/o/oauth2/token to oauth2.googleapis.com/token); if they do it again, you regenerate and re-download the JSON key, paste the new file into MyGuard, and the new URL flows through automatically. No plugin update required.
How often does the plugin actually call Google?
Once per drained queue entry, which is once per published or meaningfully-updated post (the auto-trigger gates on real post_content or post_title changes plus an advancing post_modified, so meta-only saves don’t count). The OAuth access token is cached for 50 minutes between calls, so the token-exchange round-trip happens about once an hour per service account, not once per post. If you manually re-queue a post from the Manual subtab, that’s an additional one-quota call. The daily-quota meter in the subtab shows your running total.
Related posts
- Database Boost: Free WordPress Database Optimization Plugin, the other half of the MyGuard WordPress stack: scheduled cleanup, repair, and index analysis for the same WP install you just wired into Google.
- Self-Hosted Password Manager with Vaultwarden: where to actually store that JSON service-account key after you’ve pasted it into WordPress and shredded the local copy.
- myguard Debian/Ubuntu Repository: the apt repository the MyGuard plugin ships from.
apt install wp-myguardafter adding the repo is the only thing you need to get this article’s plugin onto a server. - How to Add the myguard APT Repository: three commands and a GPG key, and you’re set up to receive plugin updates the same way you receive nginx updates.